---
title: "Grunt AI in PowerPoint"
description: "Create and edit charts and text with prompts, preview the result, and apply changes"
---
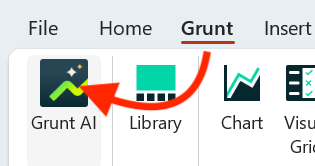
Open **Grunt AI** from the **Grunt** ribbon to create and edit content through chat. You need access to Grunt AI through your organization's plan. If the button is missing, update Grunt and check access with your administrator or [Customer Success](mailto:cs@grunt.pro).
 ## Check the active slide and selection
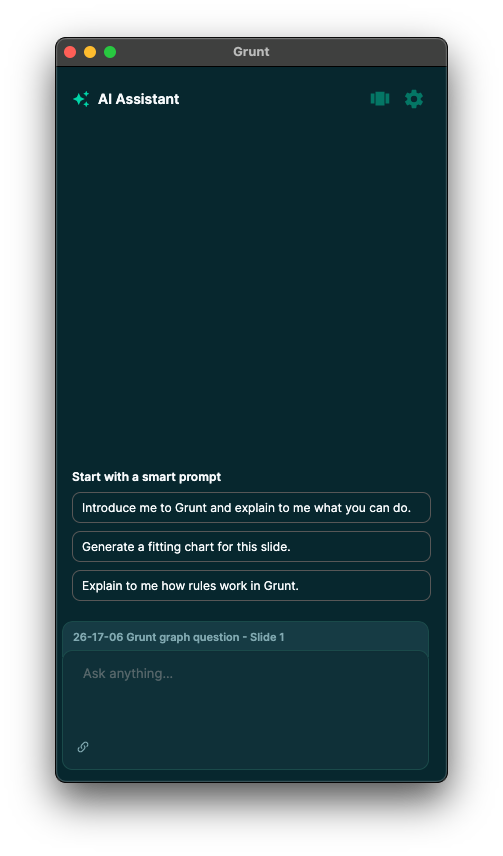
The chat opens on the right of PowerPoint. Its context shows the active slide and selected object.
Select an existing object before asking to edit it. With nothing selected, a request to create content uses the active slide. Make the selection explicit in your prompt when it matters.
## Check the active slide and selection
The chat opens on the right of PowerPoint. Its context shows the active slide and selected object.
Select an existing object before asking to edit it. With nothing selected, a request to create content uses the active slide. Make the selection explicit in your prompt when it matters.
 ## Create a chart from data
1. Paste a table or CSV text into the chat, or use the upload controls for an Excel workbook or CSV file.
2. Describe the chart type, relevant columns, and any styling you need.
3. Check the preview and underlying data.
4. Choose **Accept** to apply it or **Skip** to dismiss it.
For example:
> Create a column chart of Sales by Product using this table. Use the presentation's theme colors and show the values above each column.
## Create a chart from data
1. Paste a table or CSV text into the chat, or use the upload controls for an Excel workbook or CSV file.
2. Describe the chart type, relevant columns, and any styling you need.
3. Check the preview and underlying data.
4. Choose **Accept** to apply it or **Skip** to dismiss it.
For example:
> Create a column chart of Sales by Product using this table. Use the presentation's theme colors and show the values above each column.
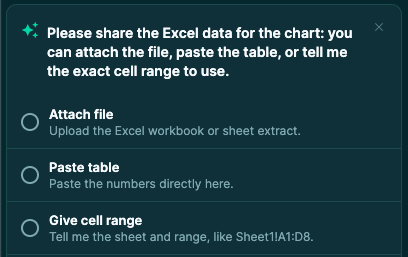 Give column headers, a sheet name, or an exact range when possible. Use one record per row and unambiguous dates such as `2026-10-16`. For large data, choose the part you need or summarize it first.
A workbook upload is not a substitute for checking whether the resulting chart has a refreshable Excel connection. Follow [Excel connections](/powerpoint-add-in/user/excel-connections) when ongoing refresh is part of the workflow.
## Edit text and resize objects
Select the object first, then make a focused request:
- “Change the selected textbox heading to ‘Q2 Outlook’ and make it 20 pt bold.”
- “Resize the selected chart to 12 cm wide and 7 cm high.”
- “Make the selected textbox 50% wider.”
Review the preview before accepting. If you need to adjust the result, continue with a specific follow-up. Available controls and supported chart behavior still apply; see [Charts](/powerpoint-add-in/user/charts#chart-axis-and-label-tips) for current label limitations.
## Settings and usage
Open the settings icon at the top of the pane to choose appearance and inspect usage. Availability depends on your plan and the supported object types in your installed version.
Give column headers, a sheet name, or an exact range when possible. Use one record per row and unambiguous dates such as `2026-10-16`. For large data, choose the part you need or summarize it first.
A workbook upload is not a substitute for checking whether the resulting chart has a refreshable Excel connection. Follow [Excel connections](/powerpoint-add-in/user/excel-connections) when ongoing refresh is part of the workflow.
## Edit text and resize objects
Select the object first, then make a focused request:
- “Change the selected textbox heading to ‘Q2 Outlook’ and make it 20 pt bold.”
- “Resize the selected chart to 12 cm wide and 7 cm high.”
- “Make the selected textbox 50% wider.”
Review the preview before accepting. If you need to adjust the result, continue with a specific follow-up. Available controls and supported chart behavior still apply; see [Charts](/powerpoint-add-in/user/charts#chart-axis-and-label-tips) for current label limitations.
## Settings and usage
Open the settings icon at the top of the pane to choose appearance and inspect usage. Availability depends on your plan and the supported object types in your installed version.
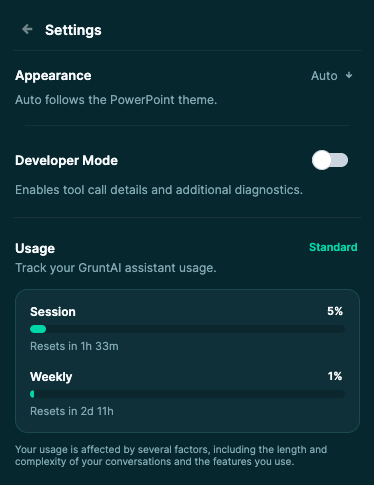 If you reach a usage limit, the pane tells you when to wait for a reset or contact your administrator. Use the displayed limits for your account rather than assuming a fixed allowance.
## Start a new conversation
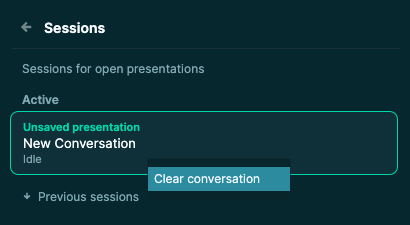
Open **Sessions**, then use the current conversation's context menu and choose **Clear conversation** when you want a fresh start. Clearing discards the conversation's history, so keep any prompts or results you need first.
If you reach a usage limit, the pane tells you when to wait for a reset or contact your administrator. Use the displayed limits for your account rather than assuming a fixed allowance.
## Start a new conversation
Open **Sessions**, then use the current conversation's context menu and choose **Clear conversation** when you want a fresh start. Clearing discards the conversation's history, so keep any prompts or results you need first.
 For help, contact [support@grunt.pro](mailto:support@grunt.pro) with your Grunt version and the action you were trying to complete.