
Set up Grunt in Claude for your organization
Distribute the Grunt plugin, configure Claude auto-connect and manage tool approvals
Set up Grunt once for your team in Claude, then let users create presentations and work with Grunt charts and tables. This guide covers Grunt Cloud, the Grunt plugin, managed sign-in and connector tool permissions.
#Before you begin
- A Claude Team or Enterprise organization with an owner who can manage connectors and plugins. Enable Cowork and Skills for marketplace distribution.
- Grunt ONE access and a Grunt administrator who can manage organization settings in the Client Portal. Ask Grunt to enable Integrations if it is unavailable.
- Existing Grunt organization members with confirmed primary email addresses and the required product access. Each person's Claude email must match their confirmed Grunt email for first-time auto-connect.
- The supported Grunt PowerPoint add-in installed for people who will open editable Grunt objects or work on an open presentation. Check your rollout version with Grunt.
- Network access described in Connect and authenticate and PowerPoint network and security.
The plugin supplies instructions for Claude; the Grunt connector supplies the tools and user authorization. Set up both. If your organization uses Microsoft work accounts, ask Grunt to configure your domain and Microsoft SSO.
#1. Distribute the Grunt plugin
- In Claude, open Organization settings → Plugins & skills → Marketplaces → Add.
- Connect a marketplace containing the
gruntplugin from Altua/GruntPluginsOfficial. - In Inventory, open the plugin's menu and choose Default access → Installed by default or Required. Enterprise administrators can instead target groups under Group access.
- Confirm that the plugin appears for the intended users in a new Claude session.
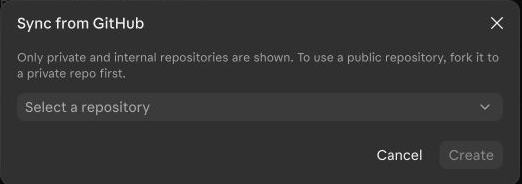
Claude's Sync from GitHub dialog may offer only private or internal repositories. If so, maintain a private copy of the public Grunt repository in your GitHub organization, give the Claude GitHub App access to it, and select that copy. Keep your copy updated from the public repository. Claude Code users can alternatively install the public marketplace directly using the commands in the Grunt plugin repository.
#2. Add the Grunt connector
- In Claude, open Organization settings → Connectors → Add and add a custom connector named Grunt.
- Enter
https://mcp.grunt.io/mcpas the connector URL and select Use Claude's published identity for the OAuth client. - Save the connector, then open it to configure managed authorization.
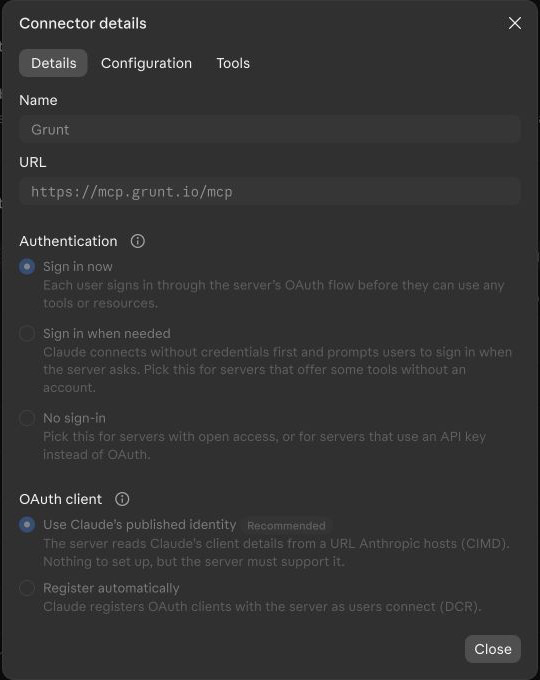
The connector is separate from the plugin. A plugin installation alone does not connect or authorize a user.
#3. Configure Claude auto-connect
Auto-connect lets eligible organization members connect without an individual Grunt authorization prompt. You configure trust in both Claude and the Grunt Client Portal.
- In Claude's Grunt connector, start Managed authorization setup, select Claude-issued, and copy the complete Issuer URL shown for your Claude organization.
- In the Client Portal, select the intended organization and open Integrations → Claude auto-connect.
- Paste the issuer into Claude issuer URL, enable email linking for existing confirmed members, enable auto-connect and save.
- Leave Advanced issuer settings → Signed issuer tenant empty unless Claude explicitly supplies a signed tenant claim.
- In Claude, keep Use Claude's published identity selected. Enter Grunt's Workspace ID in Claude's optional Tenant ID field if the issuer is trusted by more than one enabled Grunt organization; otherwise you may leave it empty.
- Run Claude's connection test as an eligible member, confirm all checks pass, select the intended roles and enable managed authorization.
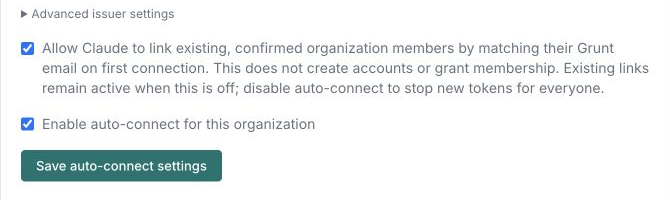
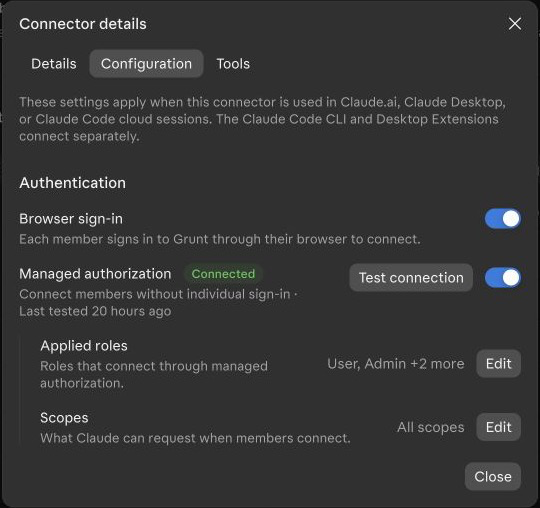
Auto-connect does not create Grunt accounts, confirm emails, add members or assign licences. Configure production and staging separately. For the full setup and offboarding behavior, see Managed Claude authentication.
#4. Allow Grunt tools without repeated approval
Grunt's connector includes tools that read information and tools that create, change or delete content. Always allow lets Claude use a permitted tool without asking the user each time, including for changes. Apply the policy your organization has approved.
- In Claude, open Organization settings → Connectors → Grunt → Tools.
- Under Default restriction for unconfigured tools, choose No restriction so users can choose Always allow, including for newly added tools.
- Review both Read-only tools and Write/delete tools. Select Always allow for each tool you want available without repeated approval; save any changes Claude presents.
- In Organization settings → Capabilities, enable Allow “Always allow” for connector tools so that choice is available for write-capable tools in Cowork.
- If you use Enterprise custom roles, check that each intended role allows the Grunt connector and its tools at Always allow; stricter organization restrictions still apply.
- When Claude prompts a user for a tool, the user can choose Always allow or Allow for all tasks where offered. Users can choose stricter settings, and some clients or operations may still require approval.
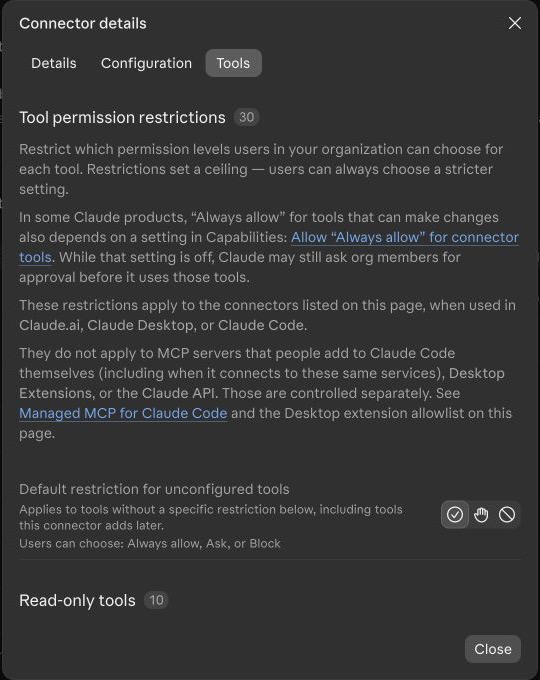
These policies apply to the organization connector in Claude's supported clients. A server added separately in the Claude Code CLI or a desktop extension has its own configuration. Always available in a conversation controls when a connector is loaded; it is separate from approval permissions.
#5. Check the setup
- As an eligible user, start a new Claude conversation and confirm the Grunt plugin and connector are available. If needed, turn on Grunt under + → Connectors.
- Ask Claude to create a chart with fictional data and confirm it returns a result owned by the expected Grunt user.
- Create a presentation containing a Grunt chart, open it in PowerPoint and confirm the chart is editable with Grunt.
- If live PowerPoint is part of your rollout, sign in to the Grunt add-in and separately test reading and changing an open presentation.
#Troubleshooting
| Problem | Check |
|---|---|
| The plugin is missing | Check Claude's marketplace sync, installation preference, target group and whether the user started a new session. |
| The connector asks a user to sign in | Check managed authorization is enabled for the user's Claude role and that the Grunt account is confirmed, belongs to the organization and has a matching email. |
| The connection test fails | Check the exact issuer, target environment, published identity and Workspace ID. See authentication troubleshooting. |
| Claude still asks before using a tool | Check the tool's restriction, any custom role, the Cowork Allow “Always allow” setting and the user's own approval choice. |
| Claude cannot change the open presentation | Confirm the supported add-in is installed, the user is signed in, and Grunt has enabled live PowerPoint access for the organization. |
Contact Grunt support with the client and add-in versions, the attempted action, the approximate time and any reference ID. Do not send tokens or client secrets.